.svg)


.svg)
![How to Use LinkedIn Sales Navigator Search Filters Like a Pro [2026 Guide]](https://cdn.prod.website-files.com/67160f781eeef22eaf34d58e/69ce69e4309170b938673cf6_LinkedIn%20Sales%20Navigator%20-%20Thumbnail.png)
Let’s face it: LinkedIn Sales Navigator is one of the most powerful manual outbound tools available. Studies have shown that companies using Sales Navigator achieved 312% ROI over 3 years, and deals sourced through Sales Navigator are 42% larger on average.
Its search filters are one of its powerful features, but still underused. Broad lead list, wrong titles, no Boolean, stale data, to mention a few, are some of the challenges I’ve seen reps face using search filters on LinkedIn Sales Navigator
This article is a detailed guide that shows you, in simple steps, how to become a pro with LinkedIn Sales Navigator search filters.
And if you're looking for the same "pro" outcomes without the tedious clicking (just like we do), we'll also show you how to automate these same workflows at scale with LinkedIn Ad Optimization tools like DemandSense.
What Makes LinkedIn Sales Navigator Search So Powerful in 2026
At first glance, Sales Navigator may look like just another prospecting tool layered on top of LinkedIn. But in reality, its search capabilities operate very differently from most B2B databases.
Sales Navigator’s Dynamic Data Updates vs. Static Databases
One of the biggest advantages of LinkedIn Sales Navigator over most B2B databases is that it runs on the live professional data from LinkedIn.
Most third-party databases, even well-regarded ones, are built by scraping, purchasing, and periodically refreshing records. This means that by the time a rep imports a list, a meaningful percentage of it is already stale: people have changed roles, companies have pivoted, and contact details are already outdated.
Sales Navigator works differently because the data is user-generated and constantly updated. When professionals change roles, update their profiles, or post content, those changes are reflected almost immediately.
Static databases simply cannot replicate this because they lack a mechanism to detect intent or behavioral shifts as they occur.
The Gap Between Regular LinkedIn Search and Sales Navigator
Many professionals assume that LinkedIn's free search is a rough equivalent of Sales Navigator, but the gap is wide:
- The free version of LinkedIn shows only 100 results per query, while LinkedIn Sales Navigator shows up to 2,500.
- Free LinkedIn limits your monthly searches based on usage, whereas Sales Navigator offers unlimited searches with no restrictions.
- Sales Navigator offers significantly more search filters than free LinkedIn, with 29 lead filters and 16 account filters compared to just 18 filters on free LinkedIn.
Precision ICP Targeting: Why Demographic Filters Alone Aren’t Enough
A common mistake even experienced Sales Navigator users make is treating it as a demographic filter tool, targeting by job title, company size, and geography, then calling it done. While these filters help narrow down prospects, they rarely capture who is actually ready to buy.
Here's an example of how demographic targeting fails compared to layered targeting.
Demographic-only search filter: VP of Sales → SaaS → 50–200 employees → US
This search filter gives you thousands of results with no signal about readiness. If you go ahead with your outreach with this list, you will only be cold-calling into the dark.
Precision ICP targeting: VP of Sales → SaaS → 50–200 employees → headcount growth 20%+ in last 6 months → company received funding in last 12 months → prospect changed jobs in last 90 days → posted on LinkedIn in last 30 days
Let’s analyze the ICP targeting above:
- Prospect changed jobs in the last 90 days : New executives are 2.5x more likely to buy new software to prove their value early.
- Headcount growth 20% in the last 6 months & company received funding in last 12 months: A growing company with more capital is more open to active investment in new tools.
- Posted on LinkedIn in the last 30 days: A prospect active on LinkedIn in the last 30 days is reachable.
These aren't nice-to-have filter stacks; they are the difference between a list and a pipeline.
Why Teams Still Struggle Despite Having Access
Given all of this power, it's worth asking why so many sales teams with active Sales Navigator licenses still underperform when it comes to outbound.
The honest answer is that the tool's ceiling is only as useful as the person operating it.
Most users use only around 20% of the available filters; hence, mastering the advanced ones is where you go over and beyond. Entire categories of high-signal filters like headcount growth rates, years in role, TeamLink warm paths, and buyer intent go unused because reps default to what they know.
It's like owning the latest iPhone and using it only to make phone calls. The processing power, the camera, the apps, the integrations, all sitting idle.
Also, it is worth noting that while LinkedIn Sales Navigator is built for precision, it is not built for volume.
It excels at manual, high-touch prospecting, the kind where a rep studies a prospect's profile, reads their recent posts, tracks their job change, and sends a tailored message that feels like it could only have been written for that one person. That's its sweet spot, and it does it better than anything else on the market.
But precision and scale are two different problems. The moment a team needs to move beyond curated lists of 50–100 high-value targets into automated, high-volume outreach sequences that are enriched, verified, and pushed through a workflow without manual intervention at every step, Sales Navigator starts to show its ceiling, and that’s where tools like DemandSense Prospector fill the gap.
While LinkedIn Sales Navigator offers ~400 business industry categories, DemandSense takes firmographics further by enriching this data with ~1K business industries, so the lists you build are as precise as possible.
Think of Marketing, even: LinkedIn offers "Marketing Services" as an umbrella term for a bunch of different areas that don't necessarily meet your ICP criteria.
Understanding The LinkedIn Sales Navigator Search Types
- Lead Search (Individual Persona Targeting)
Lead search is how you reach a specific human that matches your buyer persona. Here, you search at the person level, stacking filters like job title, seniority, function, years in role, geography, and behavioral signals like recent LinkedIn activity or job changes to surface individuals who fit your ICP.
When to use LinkedIn Lead Search: It's best used for high-touch, manually reviewed outreach where each message can be personalized to the individual. However, because results are only as fresh as the last time you ran the search, it’s not a live feed. For teams that need a continuous, automated flow of new ICP-matching leads without logging in to re-run searches, DemandSense Prospector fills that gap by proactively surfacing matching prospects as they enter your target profile.
- Account Search (Company-level Targeting)
Account Search focuses on identifying companies rather than individuals. In LinkedIn Sales Navigator, you can filter organizations by criteria such as industry, headcount, company growth, location, or hiring trend.
When to use LinkedIn Account Search: Account Search is a good starting point for any Account-based marketing. Use it before Lead Search by nailing the right companies first, then finding the right people within those companies. The limitation is that account data still requires a rep to manually review and prioritize.
A tool like DemandSense Prospector can automate matching new accounts that meet your ICP criteria and push them directly into your workflow, removing the need for a rep to remember to check.
- Boolean Keyword Search (Free-text Logic Layered on Top of Filters)
Boolean Keyword Search allows you to apply logical operators such as AND, OR, and NOT within title or keyword fields to refine search results.
When to use Boolean keyword search: Use Boolean keyword search to expand coverage while maintaining precision, ensuring that relevant prospects are not missed simply because they use slightly different titles. For example, a search could include “Head of Marketing OR VP Marketing OR Marketing Director”.
- Saved Searches (Living Lists That Update Automatically)
Once you've built a search, whether a Lead Search or an Account Search, you can save it, and Sales Navigator will automatically notify you whenever new profiles meet those search criteria.
When to use saved searches on LinkedIn: Use saved searches to monitor a defined ICP segment and to know when a new prospect enters the segment.
- Alerts (Job Change, New Prospects, Company Updates)
Alerts monitor your saved leads and accounts and notify you when something meaningful changes. For example, a saved lead gets promoted, changes companies, or posts on LinkedIn for the first time in months.
When to use alerts on LinkedIn: Use alerts on LinkedIn Sales Navigator to engage prospects at the exact moment something important changes in their professional environment. These alerts serve as conversation triggers, enabling you to reach out with relevant, timely messages rather than generic cold outreach.
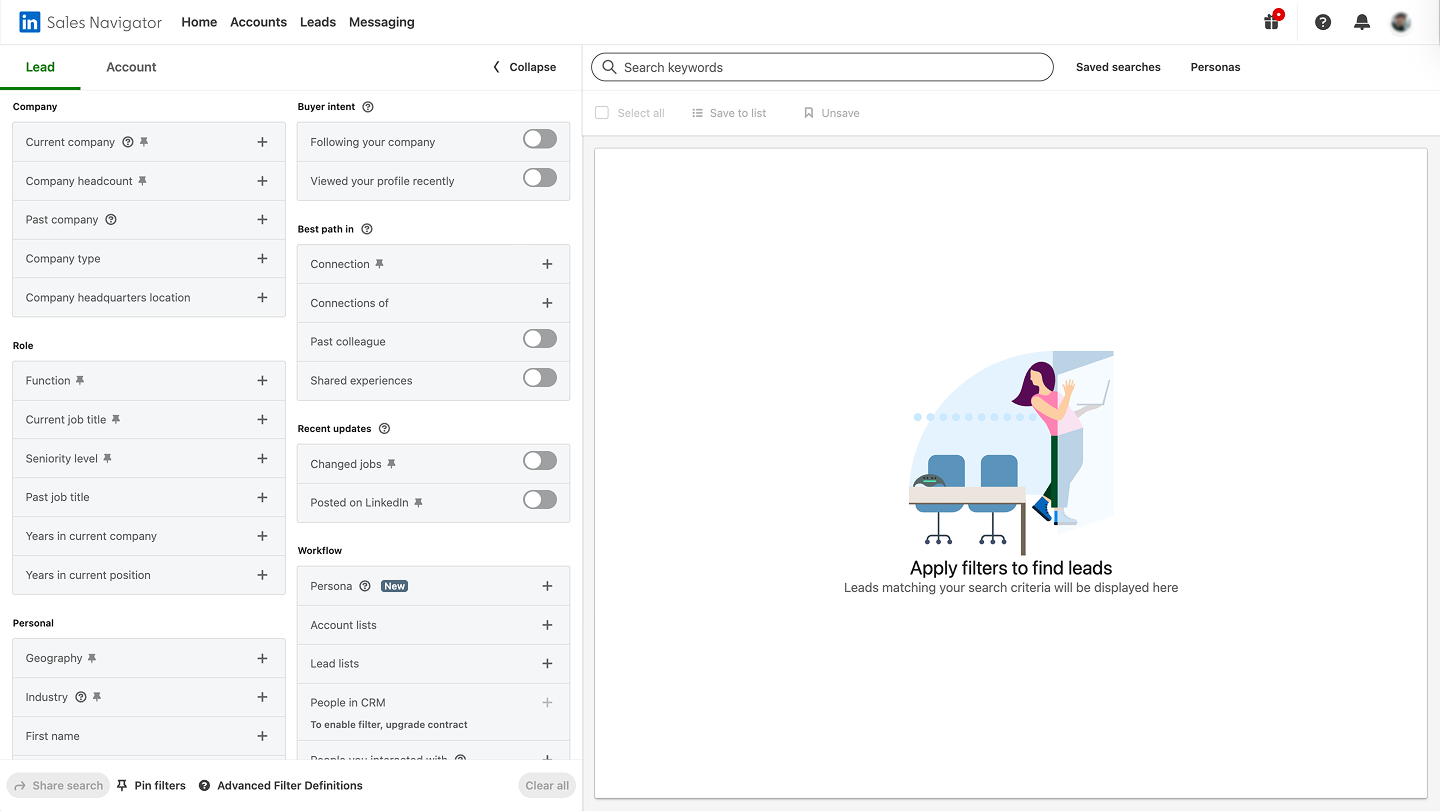
Complete Breakdown of Sales Navigator Lead Search Filters
Knowing what each filter does is one thing. Knowing how to stack them together in the right sequence, for the right prospect, at the right moment is where the real skill lives. Here is a complete breakdown of the Sales Navigator lead search filters:
- Keywords (Boolean Logic)
The keyword filter allows you to search profiles using specific words or phrases, often combined with Boolean operators to refine results. The operators are AND (both terms must appear), OR (either term can appear), and NOT (exclude a term entirely). You can also use quotation marks for exact phrases and parentheses to group logic. It captures what rigid filter categories miss, particularly for emerging roles, niche industries, or buyers who don't carry conventional titles.
- Geography
This filter lets you target prospects based on location, such as country, region, or city. It ensures you only reach prospects in markets your product serves, avoiding leads in regions where you cannot sell.
- Industry
The industry filter identifies professionals working in specific sectors, such as financial services and healthcare. The caveat here is that Sales Navigator uses a flat industry list. Selecting “Marketing Services” gives you every company in that bucket, from boutique agencies to media conglomerates. If your ICP is specifically media buying agencies rather than all marketing services, Sales Navigator forces you to over-include and manually filter out. Tools like DemandSense Audience Explorer let you select at the sub-industry level from the start.
- Headcount
This filter targets companies based on employee size. Example: Company headcount: 50–200 employees, 1–10 employees, 11–50 employees, 201–500 employees, 501–1,000 employees and so on.
- Job Title
The job title filter identifies people with specific roles. For example, you are selling a sales coaching platform. You can enter VP of Sales, Head of Sales, Director of Sales, and Sales Manager to capture decision-makers and influencers across the same function at different seniority levels and company sizes.
- Function
Function groups professionals by department or area of responsibility. Examples include: Marketing, Engineering, and Finance. Let’s say you sell a procurement tool. Instead of guessing every possible title a procurement professional might carry, you select the Operations and Finance functions and combine them with seniority filters to surface relevant buyers across both departments without building an exhaustive title list.
- Seniority
The Seniority filter ranks prospects by their level within an organization: Entry, Senior, Manager, Director, VP, CXO, Owner, and Partner. Filtering by seniority ensures your outreach reaches people who are more likely to influence purchasing decisions, approve budgets, and lead strategic initiatives
- Years in Role
The Years in Role filter narrows prospects by how long they have been in their current position. You can filter by ranges such as less than 1 year, 1 to 2 years, 3 to 5 years, and so on. People who recently started a role often evaluate existing tools, introduce new strategies, and restructure teams. These moments create opportunities for new vendors to enter the conversation.
- Years at Company
This is similar to Years in Role but measured against total tenure at the organization rather than time in their current position. A prospect could be new to their role but a ten-year veteran of the company, which carries very different implications for how you approach them. A shorter time at the company often means more openness; a longer tenure signals deeper institutional loyalty that requires a different approach.
- Posted on LinkedIn
This filter surfaces prospects who have published or shared content on LinkedIn within the last 30 days. These people are already in a public, sharing mindset, making them more likely to see your message and respond to your outreach.
- Hiring Filters
Hiring filters identify companies that are actively recruiting employees.
Here is a practical application of the filter: Let’s say you sell a sales enablement tool. You can filter for companies actively hiring for SDRs and AE roles. Those companies are building out their revenue function right now, which means they are actively evaluating and purchasing the tools those new hires will need.
- Company Type
The Company type filters companies into categories: Publicly Held, Privately Held, Non-Profit, Educational Institution, Self-Employed, Government Agency, Partnership, and Sole Proprietorship.
Here is a practical application of this filter: Let’s say you sell a grant management tool. Filter for Non-Profit organizations only, because grant tracking, donor reporting, and funding compliance are pain points that exist almost exclusively for non-profit companies.
- Groups
This filters for prospects who are members of specific LinkedIn groups. LinkedIn groups are communities built around shared interests, industries, professions, or challenges.
Here is a practical application of this filter: Let's say you sell a tool for independent financial advisors. Identify the three or four largest LinkedIn groups where independent financial advisors congregate and filter your search to members of those groups, giving you a list of people within your ICP.
- School
The School filter targets prospects who attended specific universities or educational institutions. Here is a practical application of this filter: If you attended a well-known institution, filtering for fellow alumni creates an immediate warm connection point in your outreach.
- Profile Language
The profile language filter shows the primary language used in a prospect’s profile. A prospect who set up their profile in Portuguese or French is likely more comfortable engaging in that language. Here is a practical application of this filter: Let’s say you are a recruiter sourcing a senior marketer for a German client who specifically needs candidates comfortable operating in a German-language environment. You can apply the German-language profile filter to capture people who fall under that category.
- Connection Levels
The Connection Level filter segments prospects by their proximity to you in LinkedIn's network: 1st degree (already connected), 2nd degree (connected to someone you know), and 3rd degree (no shared connection). Here is a practical application of this filter: Let’s say you are preparing for a major industry conference and want to get the best of every conversation you have on the ground. Two weeks before the event, you filter for 1st- and 2nd-degree connections in your ICP who are based in the city where the conference is being held, reach out, and start a conversation before the conference.
Complete Breakdown of Sales Navigator Account Search Filters
Here is a list of the Sales Navigator’s account search filters featuring outbound use cases:
- Industry
LinkedIn categorizes organizations by industry, including financial services, healthcare, SaaS, manufacturing, and retail. This filter is important because companies within the same industry often face similar operational challenges, regulations, and technology needs.
Here is a practical outbound use case: Say you sell a patient engagement and appointment scheduling platform. You can filter for the Hospital and Healthcare industry. These are your ICP.
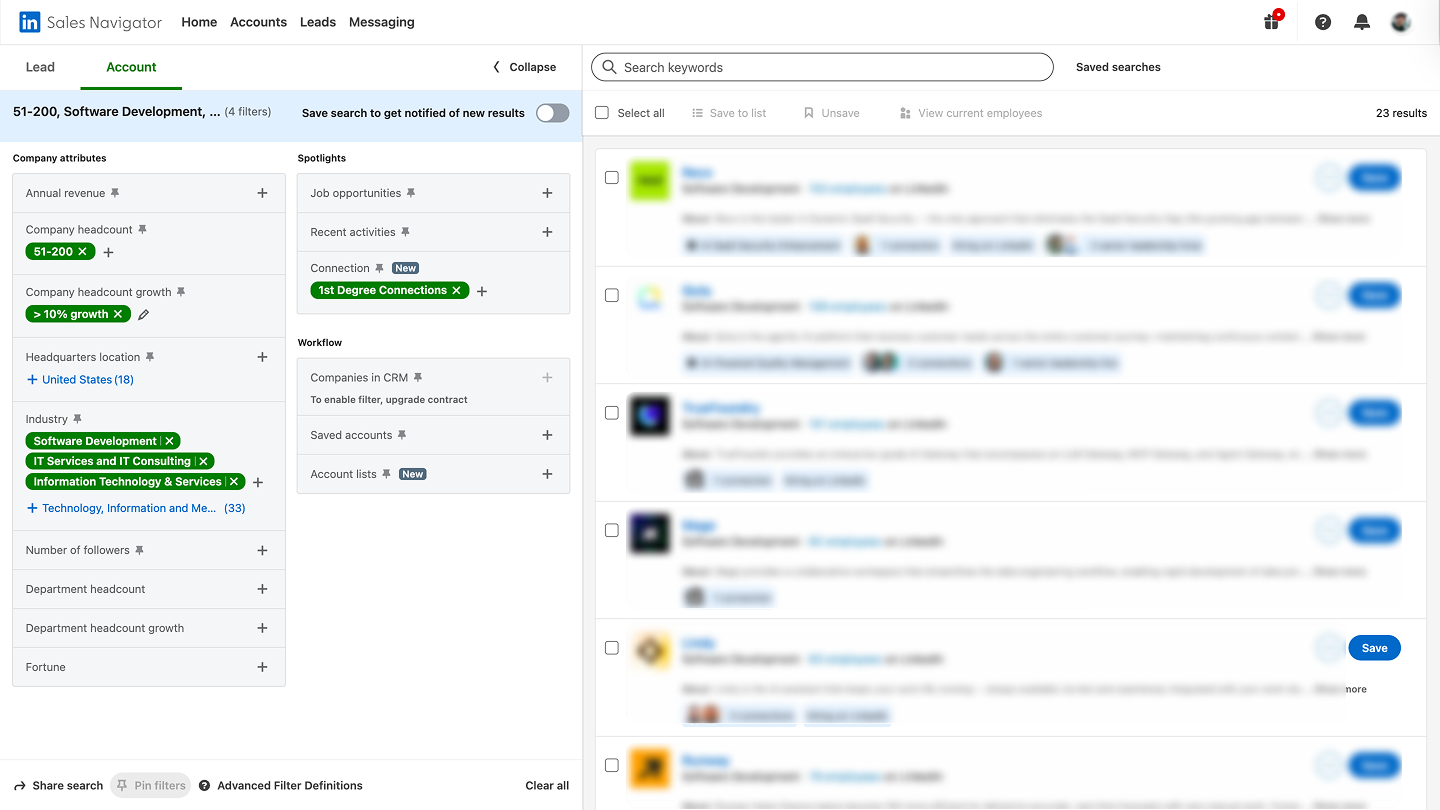
- Headcount
The Headcount filter helps you target companies based on employee size. Company size often determines the complexity of operations, internal processes, and technology requirements.
Here is a practical outbound use case: You sell a payroll and benefits administration platform. Filter for companies with 51 to 200 employees because this is the headcount threshold where managing payroll manually or with basic accounting software starts to break down. For fewer than 50 employees, a founder or office manager can handle payroll without dedicated payroll software. Above 200, companies have already invested in an enterprise HR system that is deeply embedded and difficult to displace. The 51 to 200 range is the window where the pain is loudest, the decision is most urgent, and the switching cost is still low enough to make a conversation worthwhile.
- Revenue
The Revenue filter allows sales teams to identify companies based on their estimated annual income. Revenue is often a strong indicator of budget availability and purchasing power. Common ranges include under $10M, $10M–$50M, $50M–$100M, $100M+.
Here is a practical outbound use case: You sell a brand strategy and creative agency retainer service starting at $8,000 per month. Filter for companies with revenue between $2 million and $10 million because below $2 million, marketing spend is typically founder-led and informal, and an $8,000 monthly retainer is a conversation that cannot happen without significant internal justification.
For companies above $10 million, in-house creative teams are usually built or agency relationships are established that are deeply embedded in their marketing calendar.
- Geography
The Geography filter helps identify companies located in specific countries, regions, or cities. The filter is essential for companies that operate only in certain markets or maintain region-specific sales teams.
Here is a practical outbound use case: You sell a commercial real estate management platform. Filter for companies headquartered in New York, Chicago, Los Angeles, and San Francisco because these are the four cities in the United States with the largest, most complex, and most actively traded commercial real estate portfolios.
- Growth Signals
The Growth signals filter highlights companies experiencing expansion, which you can measure through increasing employee counts or organizational scaling.
Here is a practical outbound use case: You sell an onboarding and training platform. Your best customers are companies scaling their teams rapidly and struggling to consistently bring new hires up to speed. Filter for companies that have grown headcount by more than 20% in the last six months within your target industry. Every account that surfaces is actively hiring, which means they are already experiencing the exact onboarding pain your product solves. You are not convincing them the problem exists. You are arriving at the moment the problem is loudest, with a solution already in hand.
- Job Openings
The Job Openings filter identifies companies that are actively recruiting employees through LinkedIn job listings.
Here is a practical outbound use case: You sell a customer success and churn reduction platform. You filter for companies actively hiring for Customer Success Manager, Customer Onboarding Specialist, and VP of Customer Success roles. A company building out its customer success function means two things simultaneously: its customer base has grown large enough to require structured post-sale management, and they are experiencing or anticipating the churn pressure that comes with scale. You are arriving at the moment they are investing in the human side of customer retention, with a platform that makes that human investment more effective and scalable.
- Funding Events
The Funding Events filter identifies companies that have recently raised capital through venture funding or private equity investments. Funding often signals that companies will soon hire new employees, expand operations, and adopt new technologies.
Here is a practical outbound use case: You sell a platform for brand identity and design systems. Filter for Seed- or Pre-Series A-funded companies in the last 90 days. At this stage, founders are preparing to launch publicly for the first time with real capital behind them. Brand identity suddenly becomes urgent because the company is about to be seen by customers and partners at scale. Your outreach arrives at the precise moment that investment transitions from a nice-to-have into a competitive necessity.
- Technology Stack
The Technology Stack filter allows users to identify companies that currently use specific software tools or technologies. It is built from LinkedIn's data on company tool adoption and third-party integrations, and it allows you to target accounts based on their existing tools rather than just their demographics.
Here is a practical outbound use case: You sell a project management tool. Filter for companies that use Slack and Google Workspace, but have no dedicated project management software. A company coordinating work entirely through chat and shared documents has outgrown that system. Every account on your list is one growing team away from the moment missed deadlines and accountability gaps become a leadership-level priority.
- Department Size
The Department Size filter helps identify companies with specific numbers of employees within a particular department, such as marketing, sales, or engineering. Department size reveals how developed a particular function is within a company.
Here is a practical outbound use case: You sell a sales-coaching and performance-management tool. Filter for companies with a sales department of 15 or more reps to pitch your coaching services to.
- Relationship Filters
Relationship filters highlight companies where you or your team already have existing connections or prior engagement. These signals may include shared connections, past colleagues, and team-level connections through Sales Navigator’s TeamLink feature. Here is an outbound use case: You sell a cybersecurity platform. Filter for target accounts where decision-makers have viewed your profile in the last 30 days. A prospect who visited your profile has already demonstrated curiosity about who you are. Reach out within 24 hours, referencing a relevant insight rather than a generic pitch. The message lands as a timely follow-up to their own curiosity rather than an unsolicited interruption.
How to Combine Filters Like a Pro (High-Impact Workflows)
The real power of Sales Navigator isn't in any single filter, it's in stacking them together to create razor-sharp segments. Here are five workflows you can run today.
Workflow 1: To Get Fast-Growing SaaS Companies Hiring For Your ICP Roles
Goal: If you are looking for fast-growing companies hiring for a specific role, here is a workflow you can work with:
1. Go to Account Search and set Industry
2. Set Headcount Growth → 10%+ in the past year
3. Set Company Headcount → your ICP size range (e.g., 51–500)
4. Save this as an Account List (e.g., "Fast-Growth SaaS")
5. Switch to Lead Search and filter by your saved Account List.
6. Set Job Title → keywords matching your ICP (e.g., "VP Sales," "Head of Revenue," "GTM")
7. Add Seniority Level → Director, VP, C-Level, and hit Search.
8. Sort by Recently Posted to prioritize active profiles
Workflow 2: Freshly Funded Accounts in Your Target Verticals
Goal: If you are looking for companies that were recently funded in your verticals, here is a workflow to follow:
1. Go to Account Search → set Industry to your target verticals (e.g., Fintech, HealthTech, EdTech)
2. Set Funding Events → Series A, Series B (or whichever stage fits your deal size)
3. Set the Funding Date filter → Past 90 days to stay timely.
4. Set Headcount → 11–500 (pre-scale companies more likely to be evaluating new tools)
5. Save as an Account List → e.g. "Funded Q1 2026"
6. Switch to Lead Search, load that Account List, and filter by Job Title → decision-makers in your ICP
7. Sort by Account Funding Date (newest first) and begin outreach with funding as your opener
Workflow 3: Micro-Segments for Hyper-Personalized Outreach
Example: VP Sales at Series B Fintech, 50–200 employees, NYC
Goal: Build a tight list where every lead gets a near-identical, highly relevant message.
1. Go to Account Search → Industry → Financial Services + Fintech.
2. Set Funding Stage → Series B
3. Set Company Headcount → 51–200
4. Set Geography → Greater New York City Area
5. Save as Account List → "Series B Fintech NYC 50-200."
6. Switch to Lead Search → load that Account List.
7. Set Job Title → "VP Sales," "VP of Sales," "Head of Sales."
8. Set Seniority → VP and Geography → Greater New York City Area (to match lead location, not just company HQ)
Workflow 4: Buyers Showing Intent-Like Signals
Goal: To prioritize leads who are already warm, showing behavior that suggests active research or need.
1. Go to Lead Search and set your baseline ICP filters (Title + Industry + Headcount)
2. Enable View Your Profile under Spotlights — these leads already know you exist
3. Add Posted on LinkedIn in Past 30 Days → signals active, engaged buyers.
4. Check Follow Your Company under Spotlights — high-intent indicator.
5. Cross-reference with accounts in your saved lists that have Headcount Growth → 10%+ (growth = budget)
6. Sort by Last Activity Date (most recent first)
7. Prioritize anyone who has completed 2+ of these actions—they are your hottest leads.
Tip: In your outreach, reference their post or a mutual connection, never lead with "I saw you viewed my profile" (too forward). Use it as a signal, not a script line.
Workflow 5: Churned Customers Now at New Companies
Goal: Re-engage former champions who already know and trust your product but at a brand new account.
1. Build a list of past customers (export from your CRM — names, titles, companies)
2. In Lead Search, search each contact by name or upload via CSV Upload (Sales Nav Advanced)
3. Filter by Current Company ≠ , Previous Employer — look for job change indicators in the Spotlights section → Changed Jobs in Past 90 Days.
4. Cross-check: Is their new company in your ICP? Set Current Company Headcount and Industry filters to confirm
5. Save matching leads to a dedicated list → "Churned Champions to New Roles."
6. Prioritize by seniority at the new company — a champion who moved up is even more valuable.
7. Reach out within the first 60 days of their job change, this is the golden window when new hires push for tools they trust
Tip: Your opener writes itself: "Congrats on the new role! I know you saw real results with [Product] at [Old Company]. Would love to explore if it makes sense again."
These filter combinations are powerful but need to be rebuilt manually each time. However, DemandSense Prospector runs the same logic automatically, building ICP-aligned lists using combined account and persona filters without the manual clicking.
Boolean Search Mastery for Sales Navigator
Boolean search is the difference between a list of 10,000 loosely matched leads and a tight list of 400 people who actually fit your ICP. Master this, and Sales Navigator becomes a precision instrument.
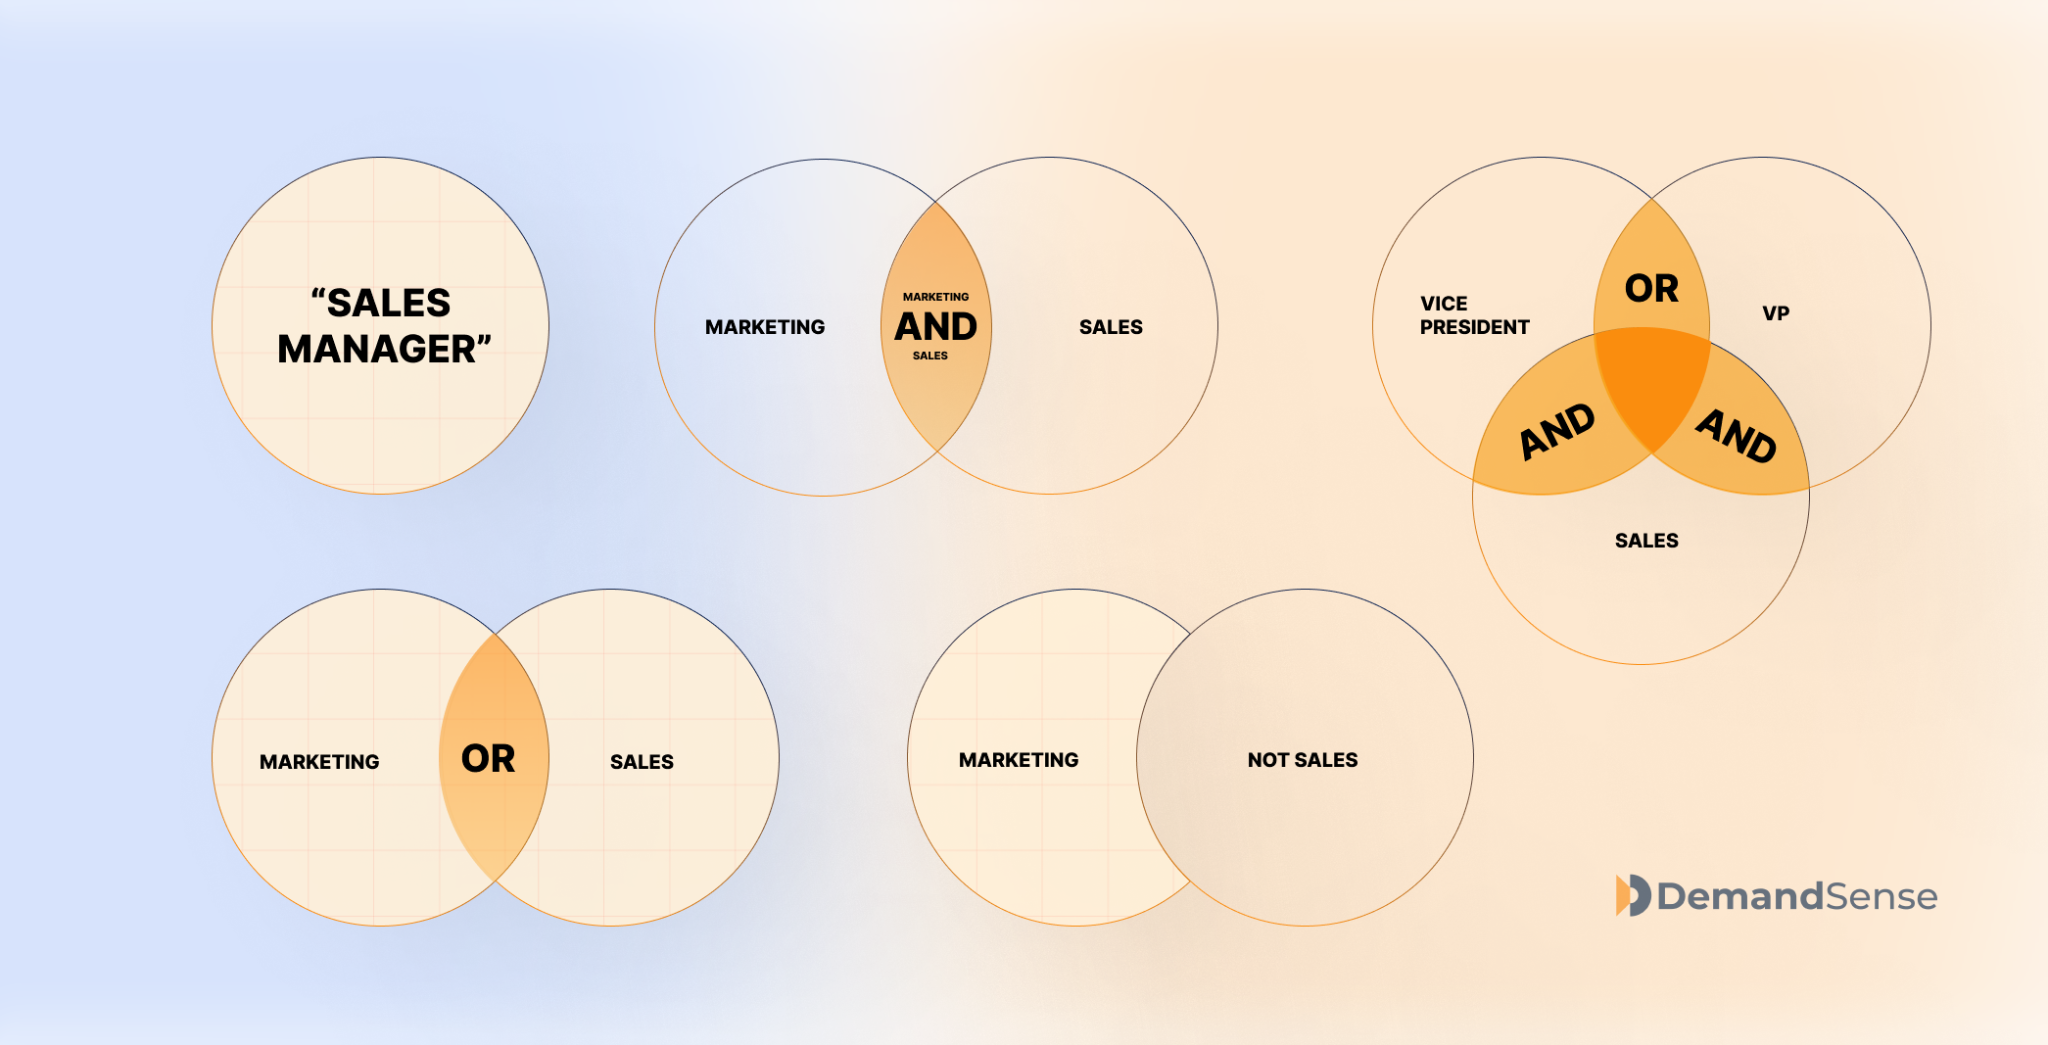
- AND — narrows results (VP AND Sales)
It tells Sales Navigator that both terms must be present. Use it to tighten a broad search.
Syntax: VP and Sales
Result: Only profiles that contain both "VP" and "Sales."
- OR — Broadens Your Results
It tells Sales Navigator to return profiles that match any of the terms. Essential for capturing all the ways a title gets written.
Syntax: CMO OR "Chief Marketing Officer" OR "Head of Marketing"
Result: Profiles containing any one of those three variations
- NOT — Excludes Unwanted Terms
It filters out results you don't want polluting your list. Use it to remove irrelevant roles, industries, or functions.
Syntax: Marketing NOT "email marketing."
Result: Marketing profiles — minus anyone whose title or profile leans into email marketing
- " " Quotation Marks (Exact Phrase Matching)
It forces Sales Nav to treat the words inside as a single phrase, not separate keywords.
Syntax: "Chief Revenue Officer"
Result: Only exact matches, not "Chief" and "Revenue" appearing separately
- ( ) Parentheses (Grouping Logic)
It works like math. Parentheses control the order of operations in your Boolean string. Without them, complex strings can behave unpredictably.
Syntax: (CMO OR "VP Marketing") AND SaaS NOT Agency
Result: Marketing leaders at SaaS companies, with agencies excluded
Special Bonus: Here Are 3 Ready-To-Use Boolean Strings For You If You Are An SDR:
- Demand Gen Leaders at B2B SaaS Companies
("Demand Generation" OR "Demand Gen" OR "Growth Marketing" OR "Performance Marketing") AND (B2B OR SaaS) NOT (agency OR freelance OR consultant)
What it does: Surfaces demand gen specialists inside B2B SaaS companies, not agencies selling demand gen services. Pair with Industry (Computer Software) and Headcount(51–500) for best results.
- Decision-Makers at Funded Startups
Syntax: (CEO OR Founder OR "Co-Founder" OR "Chief Revenue Officer" OR "VP Sales" OR "VP of Sales" OR "Head of Sales") AND (startup OR "early stage" OR "Series A" OR "Series B") NOT (investor OR advisor OR board)
What it does: Targets economic buyers at startups while stripping out investors and advisors who flood results but never buy. Layer with the Funding Events filter for maximum precision.
- Revenue Leaders at Mid-Market Companies
Syntax: ("Chief Revenue Officer" OR CRO OR "VP of Revenue" OR "VP Sales" OR "Revenue Operations" OR "Head of Revenue") AND ("mid-market" OR "midmarket" OR enterprise) NOT (associate OR coordinator OR assistant)
What it does: Catches revenue-owning titles across mid-market orgs while excluding junior roles that share similar keywords. Combine with Company Headcount (201–1,000) to anchor the company size.
Boolean search on Sales Navigator is powerful, but it comes with a real cost:
- Strings go stale fast as job titles evolve (was "Growth Hacker" in 2019, "Head of GTM" in 2024)
- One missing OR variant means you're invisible to a whole segment of your ICP
- Maintaining 10+ strings across different personas becomes a part-time job.
- You're still only searching on keywords, not intent, behavior, or buying signals.
This is where DemandSense changes the game. Instead of manually writing and maintaining Boolean strings, DemandSense builds the logic into its filter UI, so when you're pulling enriched contact data or identifying intent patterns, the targeting precision is already there.
There are no syntax errors, stale strings or missed title variants. You get the output of Boolean mastery without the maintenance overhead.
Using Buyer Intent Signals Inside Sales Navigator
Buyer intent signals are actions a prospect takes that suggest that they are more likely to be receptive to outreach right now than a cold contact. Sales Navigator doesn't have a dedicated "intent" tab, but it surfaces these signals across Alerts, Spotlights, and Account News, if you know where to look.
Signal 1: Viewed Your Content
This means the person saw something you or your company published and engaged with it. They didn't stumble onto your profile by accident, they clicked, read, and left a digital footprint. You can find people who viewed your content on your Homepage feed alerts and your LinkedIn post notifications.
Suggested outreach angle: Act within 24–48 hours and lead with the specific piece they viewed.
Here is an example: "Hey [Name], saw you came across our post on [topic]. Curious what caught your attention, we work with a lot of [their role/industry] teams on exactly that. Worth a quick conversation?"
Note that if multiple people from the same account viewed the same piece of content, that's an account-level signal; there may be an active internal conversation happening. Prioritize that account immediately.
Signal 2: Viewed Your Profile
It means they searched for you or clicked on your name. This is the closest thing to a prospect raising their hand without having to fill out a form.
You can find those who viewed your profile in the last 90 days with Sales Navigator.
You can reach out within 24 hours, but rather than saying "I noticed you viewed my profile," which may sound creepy, try "Hi [Name], came across your profile and noticed we're both in the [industry/space]. I work with [role] teams at companies like yours on [specific problem]. Would love to connect."
Signal 3: Followed Your Company Page
This means they're aware of your brand and chose to stay in the loop. You can find this intent signal in your LinkedIn Company Page admin view. They're browsing, not buying yet.
Make the connection feel natural, Here is a template on how to reach out to such:
"Hi [Name], noticed you've been following [Company]. We've been putting out a lot of content on [topic] lately, curious if any of it has been relevant to what you're working on?"
Signal 4: Changed Jobs
They've moved to a new role, and the first 90 days in any new position is the single highest-probability buying window in a person's career. There are new priorities and a budget to allocate. Lead with genuine congratulations, then move to relevance.
"Congrats on the new role at [Company], [Name], exciting move. I work with [their new title] teams on [specific problem area]. Given you're likely mapping out priorities right now, would it be worth a quick 20 minutes to compare notes on what's working for teams like yours?"
Signal 5: Company Growth or Hiring
This often means that the company is investing in headcount and in infrastructure. Growth creates problems, and problems create buying needs. A company scaling from 50 to 150 people in six months is almost certainly evaluating new tools. When reaching out, position yourself as an expert who helps companies navigate the exact stage they're at. Here is a template:
"Noticed [Company] has been growing fast, congrats on the momentum. We work with many [industry] teams going through similar growth phases, and [specific pain points at that stage] often come up. Happy to share what others have done if it's useful."
Signal 6: Funding Updates
They just raised money, and the board has expectations. Leadership has specified time to show growth, and this is arguably the highest-conviction buying window in B2B sales. Refer to the funding directly and tie it to the growth pressure it entails. Decision-makers respect reps who understand their world.
Here is an outreach template you can work with: "Congrats on the raise, exciting stage for [Company]. I work with many post-[Series] teams on [problem]. Happy to connect and share what's been working."
Saving Searches, Automating Alerts, and Tracking ICP Shifts
Most reps build a great list once, work it to death, and then start from scratch. That’s not how to get the best from LinkedIn Sales Navigator.
If you want to consistently hit your quota, treat Sales Navigator as a living system, not a one-time search, and saved searches and alerts are how you make that happen.
How To Set Up Weekly List Refreshes:
- Run your ideal Lead Search using your full filter stack (Title + Industry + Headcount + Geography + any Boolean strings)
- Once you're satisfied with the results, click Save Search in the top right of the results page.
- Name it clearly using something you'll recognize in 6 months.
- Set the alert frequency → choose Weekly (daily works if you're in high-velocity prospecting mode)
- Sales Nav will now email you every week with new leads that match that exact criteria.
- Open the alert, review the new additions, and move qualified leads into your active outreach lists.
A little pro tip here: Don't save searches that are too broad. For example, 50,000 results mean weekly noise, not signal. Aim for saved searches that return 500–3,000 leads so the weekly additions are manageable and relevant.
Automated Job Change Alerts — When And How To Act
When it comes to automated job change, here is how to get the best out of it:
- Day 1–3: Drop a comment on the announcement post, congratulating them
- Day 3-4: Send a connection request — no pitch. After your request is accepted, send a message congratulating them on the job once again and introduce yourself. Let them know it’s great to have them in your network.
- Day 8–21: Follow up with relevance: tie your solution to their new priorities
- Day 22–60: If no response, one final value-add touch — a relevant resource or insight
- Day 60–90: Move to long-term nurture — the window is closing, but not gone
- 90+ days: They're settled in. Treat it as a standard ICP prospect going forward
New Prospects Matching Saved Criteria
Sales Navigator alerts you when entirely new people enter your saved search universe, whether because they got promoted into your ICP title, joined a company that fits your filters, or simply updated their profile in a way that now matches your criteria.
When reaching out to them, lead with timeliness in your messaging. For example: "You recently joined [Company]..." or "Looks like you've moved into a [Title] role..." signals you're paying attention and are relevant right now.
Using Saved Searches To Maintain A Growing Pipeline Without Rebuilding From Scratch
Saved searches in Sales Navigator automatically surface new leads matching your criteria every week so your pipeline grows continuously without you manually rebuilding lists from scratch.
Pro Tips the Top 1% of Sales Navigator Users Rely On
Here are pro-tips that top Sales Navigator users rely on
- Build Multiple Micro-ICP Lists Rather Than One Broad List.
A micro-ICP is a very focused segment of your market with similar context, problems, and triggers. Because the prospects share similar realities, outreach messages feel highly relevant rather than generic, yielding more results.
A redditor shared that 18,000 sends yielded 160 responses, but when they built a micro ICP list, they got 172 responses from 5,500 sends. It’s not about how large your lists are, but about how relevant they are.
- Avoid Over-Filtering — Fewer Than 100 Results Usually Means It's Too Narrow.
Using too many filters may remove good prospects that don’t perfectly match every condition. If a search returns fewer than ~100 leads, it’s often a sign that the query is overly restrictive.
- Map Titles To Functions Instead Of Relying On Job Titles Alone
If you search for just CMO, you will miss out on people with different titles but the same functions. For example, synonymous with CMO are Marketing Managers, VP of Marketing, Head of Marketing, Director of Marketing, Head of Growth, Marketing Lead, among others. Rather than relying solely on titles, map it out together with a function, e.g., Function: Marketing. Seniority: Director, VP, CXO,
- Use Intent-Like Signals For Warm Outreach Angles, Not Cold Openers.
Job changes, company growth alerts, and new LinkedIn posts are warm entry points and conversation starters.
- Validate Lists Before Sequencing — Bad Data In, Bad Results Out.
Running 500 unvalidated leads into a sequence is one of the most expensive mistakes in outbound. Bounced emails tank your domain health. Wrong titles waste your team's time. Outdated contacts generate opt-outs before you've even started.
The top 1% validate before they sequence, every time, without exception. A clean list of 300 outperforms a dirty list of 1,000 every single time.
- Revisit and Refresh Saved Searches Monthly.
Saved searches go stale fast, people change roles, companies pivot. The 1% treat saved searches like a CRM hygiene task. But this is one of the limits of Sales Navigator; this is a manual task. DemandSense Prospector can proactively surface new ICP-matching prospects without requiring the rep to log in and refresh.
Common Sales Navigator Mistakes And How to Avoid Them
- Over-Filtering Until The List Is Too Small to Be Useful
Many users stack too many filters at once (industry, headcount, revenue, specific titles, geography, keywords). The result is a list of 20–80 leads, which is too small to support meaningful outbound campaigns. Rather, start with core filters first, then refine gradually.
- Searching By Literal Job Titles Instead Of Functions
Relying only on specific job titles like “CMO” or “VP Sales.” Titles vary significantly across companies, especially in startups where responsibilities don’t match traditional titles. Rather, search by Function + Seniority, then refine with title keywords.
Then add Boolean title keywords if needed. This captures people with titles like Growth Lead, Marketing Director, Demand Gen Head, who perform the same function.
- Ignoring Seniority Filters
Targeting prospects without filtering by seniority often results in lists full of junior employees who cannot make purchasing decisions. Rather, use seniority filters to focus on decision-makers or influencers, depending on your sales strategy.
- Not Using Boolean At All
Many users rely entirely on platform filters and ignore Boolean search, limiting their ability to capture title variations or exclude irrelevant roles. Rather, use Boolean operators in the title or keyword fields to expand coverage. Here is an example: ("Head of Marketing" OR "VP Marketing" OR "Marketing Director" OR "Growth Lead"). Boolean helps you capture multiple title variations in one search, making your lists more complete.
- Forgetting To Refresh Saved Searches (Stale Data = Wasted Outreach)
Prospect lists become outdated quickly. People change jobs, companies grow, or new prospects enter the market. If lists aren’t refreshed, outreach may target people who no longer fit the ICP. Rather, review and refresh saved searches at least once per month.
- Not Validating Data Before Loading Into Sequences
Many teams export Sales Navigator lists directly into email or LinkedIn automation tools without reviewing them. This often leads to wrong personas, irrelevant industries, and inaccurate titles.
Rather, before launching a campaign, manually review a sample of leads from the list, confirm they match your actual ICP and use case, and remove obvious mismatches or irrelevant profiles.
FAQs on LinkedIn Sales Navigator Filters & Search
- How Do I Use Sales Navigator Filters Effectively?
To use Sales Navigator filters effectively, start with your ICP definition and work backward to the filters. Stack 3–5 filters that reflect real buying signals, not just demographic ones. Begin with Job Title, Seniority Level, Industry, and Company Headcount, then layer in behavioral filters like Posted on LinkedIn or Changed Jobs to prioritize active and in-market prospects.
- What Is The Best Way to Combine Sales Navigator Filters?
The best way to combine filters is to pair them with when. Start with firmographic filters (Industry, Headcount, Geography) to define the universe, then add role filters (Title, Seniority, Department) to identify the right person, and finally layer in signal-based filters (Funding Events, Job Changes, Headcount Growth) to prioritize timing. For example: Fintech + 51–200 employees + VP of Sales + Series B funding in the past 90 days produces a list of leads who fit your ICP and are in an active buying window.
- How Does Boolean Search Work In Sales Navigator?
Boolean search lets you control exactly what appears in your results using five operators. AND narrows results by requiring both terms. OR broadens results by accepting either term. NOT excludes unwanted terms. Quotation marks lock in exact phrases. Parentheses group logic so complex strings behave predictably.
- Which Filters Are Best For Finding ICP prospects?
The highest-signal filter combinations for ICP prospecting are: Job Title + Seniority Level to identify the right decision-maker; Industry + Company Headcount to match firmographic fit; and Funding Events or Headcount Growth to confirm buying readiness. For behavioral precision, add Posted on LinkedIn in Past 30 Days to prioritize active prospects and Changed Jobs in Past 90 Days to catch buyers in motion.
- How Often Should Sales Navigator Saved Searches Be Updated?
Saved searches should be reviewed monthly at a minimum, quarterly at most. Title conventions shift, ICPs evolve, and searches that were sharp six months ago can silently drift into irrelevance. A stale saved search doesn't just underperform; it creates alert fatigue that causes reps to stop opening notifications entirely.